

How To Add Macro's To Other Acion Bars
Excel 2019: How to Create Excel Macros to Automate Commands
- Click File → Options or press Alt+FT to open the Excel Options dialog box.
- Click Customize Ribbon, then select the Developer cheque box under Main Tabs in the Customize the Ribbon list box on the correct side of the dialog box, and so click OK.
When y'all plow on the Excel macro recorder in the Record Macro dialog box — opened by clicking the Record Macro push on the Status bar (automatically added once you lot record your first macro), the Record Macro option on the Macros push button'due south drop-downwardly menu (Alt+WMR), or fifty-fifty the Record Macro push on the Developer tab (Alt+LR) — the macro recorder records all your actions in the active worksheet or chart sheet when you make them.
The Excel macro recorder doesn't record the keystrokes or mouse actions that you take to achieve an activeness — merely the VBA code required to perform the activity itself. This means that mistakes that you make while taking an action that you lot rectify won't be recorded equally part of the macro; for example, if you make a typing error and then edit it while the macro recorder is on, only the corrected entry shows up in the macro without the original mistakes and steps taken to remedy them.
The Excel macros that you lot create with the macro recorder tin can be stored as part of the electric current workbook, in a new workbook, or in a special, globally available Personal Macro Workbook named PERSONAL.XLSB that's stored in a binder called XLSTART on your difficult drive. When you record an Excel macro as office of your Personal Macro Workbook, you lot can run that macro from any workbook that yous have open. (This is because the PERSONAL.XLSB workbook is secretly opened whenever you launch Excel, and although information technology remains hidden, its macros are ever bachelor.) When yous record macros every bit part of the current workbook or a new workbook, you lot can run those macros only when the workbook in which they were recorded is open in Excel.When you lot create a macro with the macro recorder, you decide not only the workbook in which to store the macro simply also what proper noun and shortcut keystrokes to assign to the macro that you are creating. When assigning a name for your macro, utilise the same guidelines that you lot apply when you assign a standard range name to a jail cell range in your worksheet. When assigning a shortcut keystroke to run the macro, you tin assign
- The Ctrl central plus a letter from A to Z, as in Ctrl+Q
- Ctrl+Shift and a alphabetic character from A to Z, as in Ctrl+Shift+Q
To see how easy it is to create a macro with the macro recorder, follow these steps for creating a macro that enters the visitor name in 12-point, assuming type and centers the visitor proper noun beyond rows A through E with the Merge and Centre feature:
- Open the Excel workbook that contains the worksheet data or chart you want your macro to work with.
If you're building a macro that adds new data to a worksheet (every bit in this example), open up a worksheet with plenty of blank cells in which to add the data. If yous're building a macro that needs to exist in a item jail cell when its steps are played dorsum, put the jail cell pointer in that cell.
- Click Record Macro button on the Status bar or Alt+WMR or Alt+LR if you accept added the Programmer tab to the Ribbon.
The Tape Macro dialog box opens where you enter the macro proper name, define whatsoever keystroke shortcut, select the workbook in which to shop the macro, and enter a description of the macro's role.
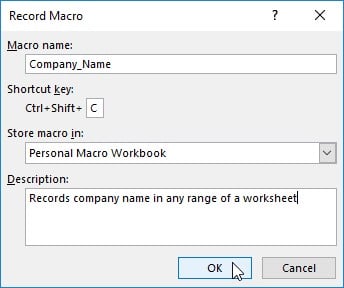 Defining the new macro to record in the Tape Macro dialog box.
 - Supersede the Macro1 temporary macro name by entering your proper noun for the macro in the Macro Name text box.
Remember that when naming a macro, you must non use spaces in the macro name and it must begin with a alphabetic character and not some number or punctuation symbol. For this example macro, y'all replace Macro1 in the Macro Name text box with the proper name Company_Name.
Adjacent, you tin can enter a letter between A and Z that acts like a shortcut key for running the macro when you lot press Ctrl followed by that letter key. Merely remember that Excel has already assigned a number of Ctrl+letter keystroke shortcuts for doing mutual tasks, such as Ctrl+C for copying an detail to the Clipboard and Ctrl+V for pasting an detail from the Clipboard into the worksheet (meet the Cheat Canvass for a complete list). If you lot assign the same keystrokes to the macro you lot're building, your macro's shortcut keys override and, therefore, disable Excel's set-made shortcut keystrokes.
- (Optional) Click the Shortcut key text box and so enter the alphabetic character of the alphabet that you want to assign to the macro.
For this example macro, press Shift+C to assign Ctrl+Shift+C as the shortcut keystroke (and then as non to disable the ready-made Ctrl+C shortcut).
Next, yous need to decide where to salvage the new macro that y'all're building. Select Personal Macro Workbook on the Store Macro In drib-down listing box to be able to run the macro anytime you lot like. Select This Workbook (the default) when you lot need to run the macro only when the current workbook is open. Select New Workbook if you want to open up a new workbook in which to record and save the new macro.
- Click the Personal Macro Workbook, New Workbook, or This Workbook option on the Store Macro In drop-down list to point where to store the new macro.
For this example macro, select the Personal Macro Workbook so that yous can use it to enter the company name in any Excel workbook that you create or edit.
Next, you should document the purpose and function of your macro in the Description list box. Although this stride is purely optional, information technology is a proficient idea to get in the habit of recording this information every time you build a new macro so that y'all and your coworkers can always know what to expect from the macro when it's run.
- (Optional) Click the Description listing box and then insert a brief clarification of the macro's purpose in front of the information indicating the date and who recorded the macro.
Now you're ready to close the Record Macro dialog box and beginning recording your macro.
- Click OK to close the Record Macro dialog box.
The Tape Macro dialog box closes, the square Stop Recording button appears on the Status bar, and the Record Macro option becomes Stop Recording on the Macros button'south drop-downwardly menu and in the Code group on the Programmer tab.
On the Macros button's drop-down menu on the Ribbon's View tab and Code group on the Developer tab, you find a Use Relative References choice. You click this drop-downward menu item or command button when you lot want the macro recorder to record the Excel macro relative to the position of the current cell. For this instance macro, which enters the company name and formats it in the worksheet, you definitely need to click the Utilise Relative References button before you lot start recording commands. Otherwise, you tin can employ the macro only to enter the company name starting in cell A1 of a worksheet.
- (Optional) Click the Apply Relative References option on the Macros button's drop-down menu on the View tab or click the Use Relative References button on the Developer tab if you want to be able to play dorsum the macro anywhere in the Excel sail.
- Select the cells, enter the data, and choose the Excel commands required to perform the tasks that you lot want recorded just every bit you unremarkably would in creating or editing the current worksheet, using the keyboard, the mouse, or a combination of the 2.
For the instance macro, type the company name and click the Enter button on the Formula bar to consummate the entry in the current cell. Next, click the Assuming push and so click 12 on the Font Size driblet-downwardly list in the Font group on the Home tab. Finally, drag through cells A1:E1 to select this range and and then click the Merge and Eye control button, again on the Dwelling house tab.
After you finish taking all the actions in Excel that you want recorded, you're ready to shut off the macro recorder.
- Click the Stop Recording push on the Status bar or select Stop Recording option on the View or Programmer tab on the Ribbon.
The square End Recording button on the Condition bar turns into a Record Macro button (with an icon showing a tiny worksheet with a circle in the left corner). This lets you know that the macro recorder is now turned off and no farther actions will be recorded.
Afterwards you lot end recording your get-go macro in Excel 2019, the Record Macro push continues to appear on the Status bar whenever y'all use the program. This means that you can click or tap this button to open the Tape Macro dialog box whenever you need to create new macros rather than having to select the Tape Macro selection on the View or Developer tab of the Ribbon, as described in the previous steps.
Assigning Excel macros to the Ribbon and the Quick Access toolbar
If you prefer, instead of running a macro by selecting it in the Macro dialog box or past pressing shortcut keys you assign to it, you can assign it to a custom tab on the Ribbon or a custom button on the Quick Access toolbar so run information technology by clicking that custom button.To assign an Excel macro to a custom group on a custom Ribbon tab, you follow these steps:
- Click File → Options and then click the Customize Ribbon tab in the Excel Options dialog box (or press Alt+FTC).
Excel displays the Customize Ribbon pane in the Excel Options dialog box.
- Click Macros in the Choose Commands From drop-down list box on the left.
Excel lists the names of all the macros created, both those in the electric current workbook and those that are saved in the PERSONAL.XLSB workbook, in the Choose Commands From list box.
- Click the name of the custom group on the custom tab to which you want to add together the macro in the Main Tabs list box on the right.
If y'all haven't already created a custom tab and grouping for the macro or need to create a new 1, follow these steps:
- Click the New Tab button at the lesser of the Chief Tabs list.
Excel adds both a New Tab (Custom) and New Group (Custom) item to the Main Tabs list while at the same time selecting the New Group (Custom) item.
- Click the New Tab (Custom) particular you just added to the Main Tabs.
- Click the Rename button at the lesser of the Principal Tabs listing box and and then blazon a brandish name for the new custom tab before you click OK.
- Click the New Group (Custom) item right below the custom tab you only renamed.
- Click the Rename button and and so type a display name for the new custom group earlier you click OK.
- Click the New Tab button at the lesser of the Chief Tabs list.
- In the Choose Commands From list box on the left, click the name of the macro y'all desire to add to the custom group now selected in the Principal Tabs listing box on the correct.
- Click the Add together button to add the selected Excel macro to the selected custom group on your custom tab. If you want to rename the macro and/or assign it a new icon, click the Rename button and make these changes in the Rename dialog box earlier you click the OK push button to shut the Excel Options dialog box.
Afterwards yous add a macro to the custom grouping of a custom tab, the name of the macro appears on a button on the custom tab of the Ribbon. Then, all you have to do to run the macro is click this command push.
- Click the Customize Quick Access Toolbar push at the end of the Quick Access toolbar and then click More Commands on its drop-downward menu.
Excel opens the Excel Options dialog box with the Quick Access Toolbar tab selected.
- Click Macros in the Choose Commands From drop-down list box.
Excel lists the names of all the macros you created, both those in the current Excel workbook and those that are saved in the PERSONAL.XLSB workbook, in the Cull Commands From list box.
- Click the name of the macro to add to a custom push button on the Quick Admission toolbar in the Choose Commands From list box and so click the Add together push button.
- Click the Modify button to open the Modify Button dialog box if you want to alter the display name and assign a different icon to the macro button.
- Click OK to shut the Excel Options dialog box.
Nigh This Article
This article is from the book:
- Excel 2019 For Dummies ,
This article can be found in the category:
- Excel ,

How To Add Macro's To Other Acion Bars,
Source: https://www.dummies.com/article/technology/software/microsoft-products/excel/excel-2019-how-to-create-excel-macros-to-automate-commands-257163/
Posted by: jonesbeink1945.blogspot.com
0 Response to "How To Add Macro's To Other Acion Bars"
Post a Comment